Documentation Index
Fetch the complete documentation index at: https://docs.capx.ai/llms.txt
Use this file to discover all available pages before exploring further.
Operators on Mainnet are essential to the functioning of the actual decentralized AI infrastructure and are compensated accordingly.
Key considerations for Mainnet registration:
- Full stake requirement must be met
- Production-grade hardware is necessary
- Higher uptime and reliability expectations
- Real economic incentives and rewards
- Participation in network consensus
- Reputation building within the ecosystem
Mainnet operators who consistently maintain high-quality service become eligible for additional incentives and may receive priority for new feature testing.
Mainnet Registration Steps
Capx Cloud Network Dashboard- here.
Capx Cloud is using Othentic stack to host it’s AVS network with Symbiotic.
Install the Othentic CLI
- Make sure you are running Node version 22.6 and not the latest. The latest node version has issues that are widely know and will cause issues with the running of the othentic-cli
- othentic-cli should not be run inside the folder that has the .env file. If you do, it will throw errors.
Installing Othentic CLI with npm:npm i -g @othentic/othentic-cli
Verify installation by the command:The outcome should be similar to (version can be higher than the below):othentic-cli version 1.3.0
CLI installation is completed.Configure the below env variables :L1_RPC=https://eth-mainnet.g.alchemy.com/v2/cfbG2jJdddQ1A64OaB3C0uV60A9qM_KD
L2_RPC=https://arb-mainnet.g.alchemy.com/v2/cfbG2jJdddQ1A64OaB3C0uV60A9qM_KD
L1_CHAIN=1
L2_CHAIN=42161
These environment variables are used to configure the network:
- L1_RPC: The RPC endpoint URL for the
Ethereum network
- L2_RPC: The RPC endpoint URL for the
Arbitrum network
- L1_CHAIN: The chain identifier for the
Ethereum network
- L2_CHAIN: The chain identifier for the
Arbitrum network
These variables need to be properly configured before proceeding with the operator registration process.Register as an Operator
The Othentic CLI allows you to easily register your Operators.Capx Cloud Network address - 0x476Ceb36F6f250297Bb59d45f00bdB053445E9CB
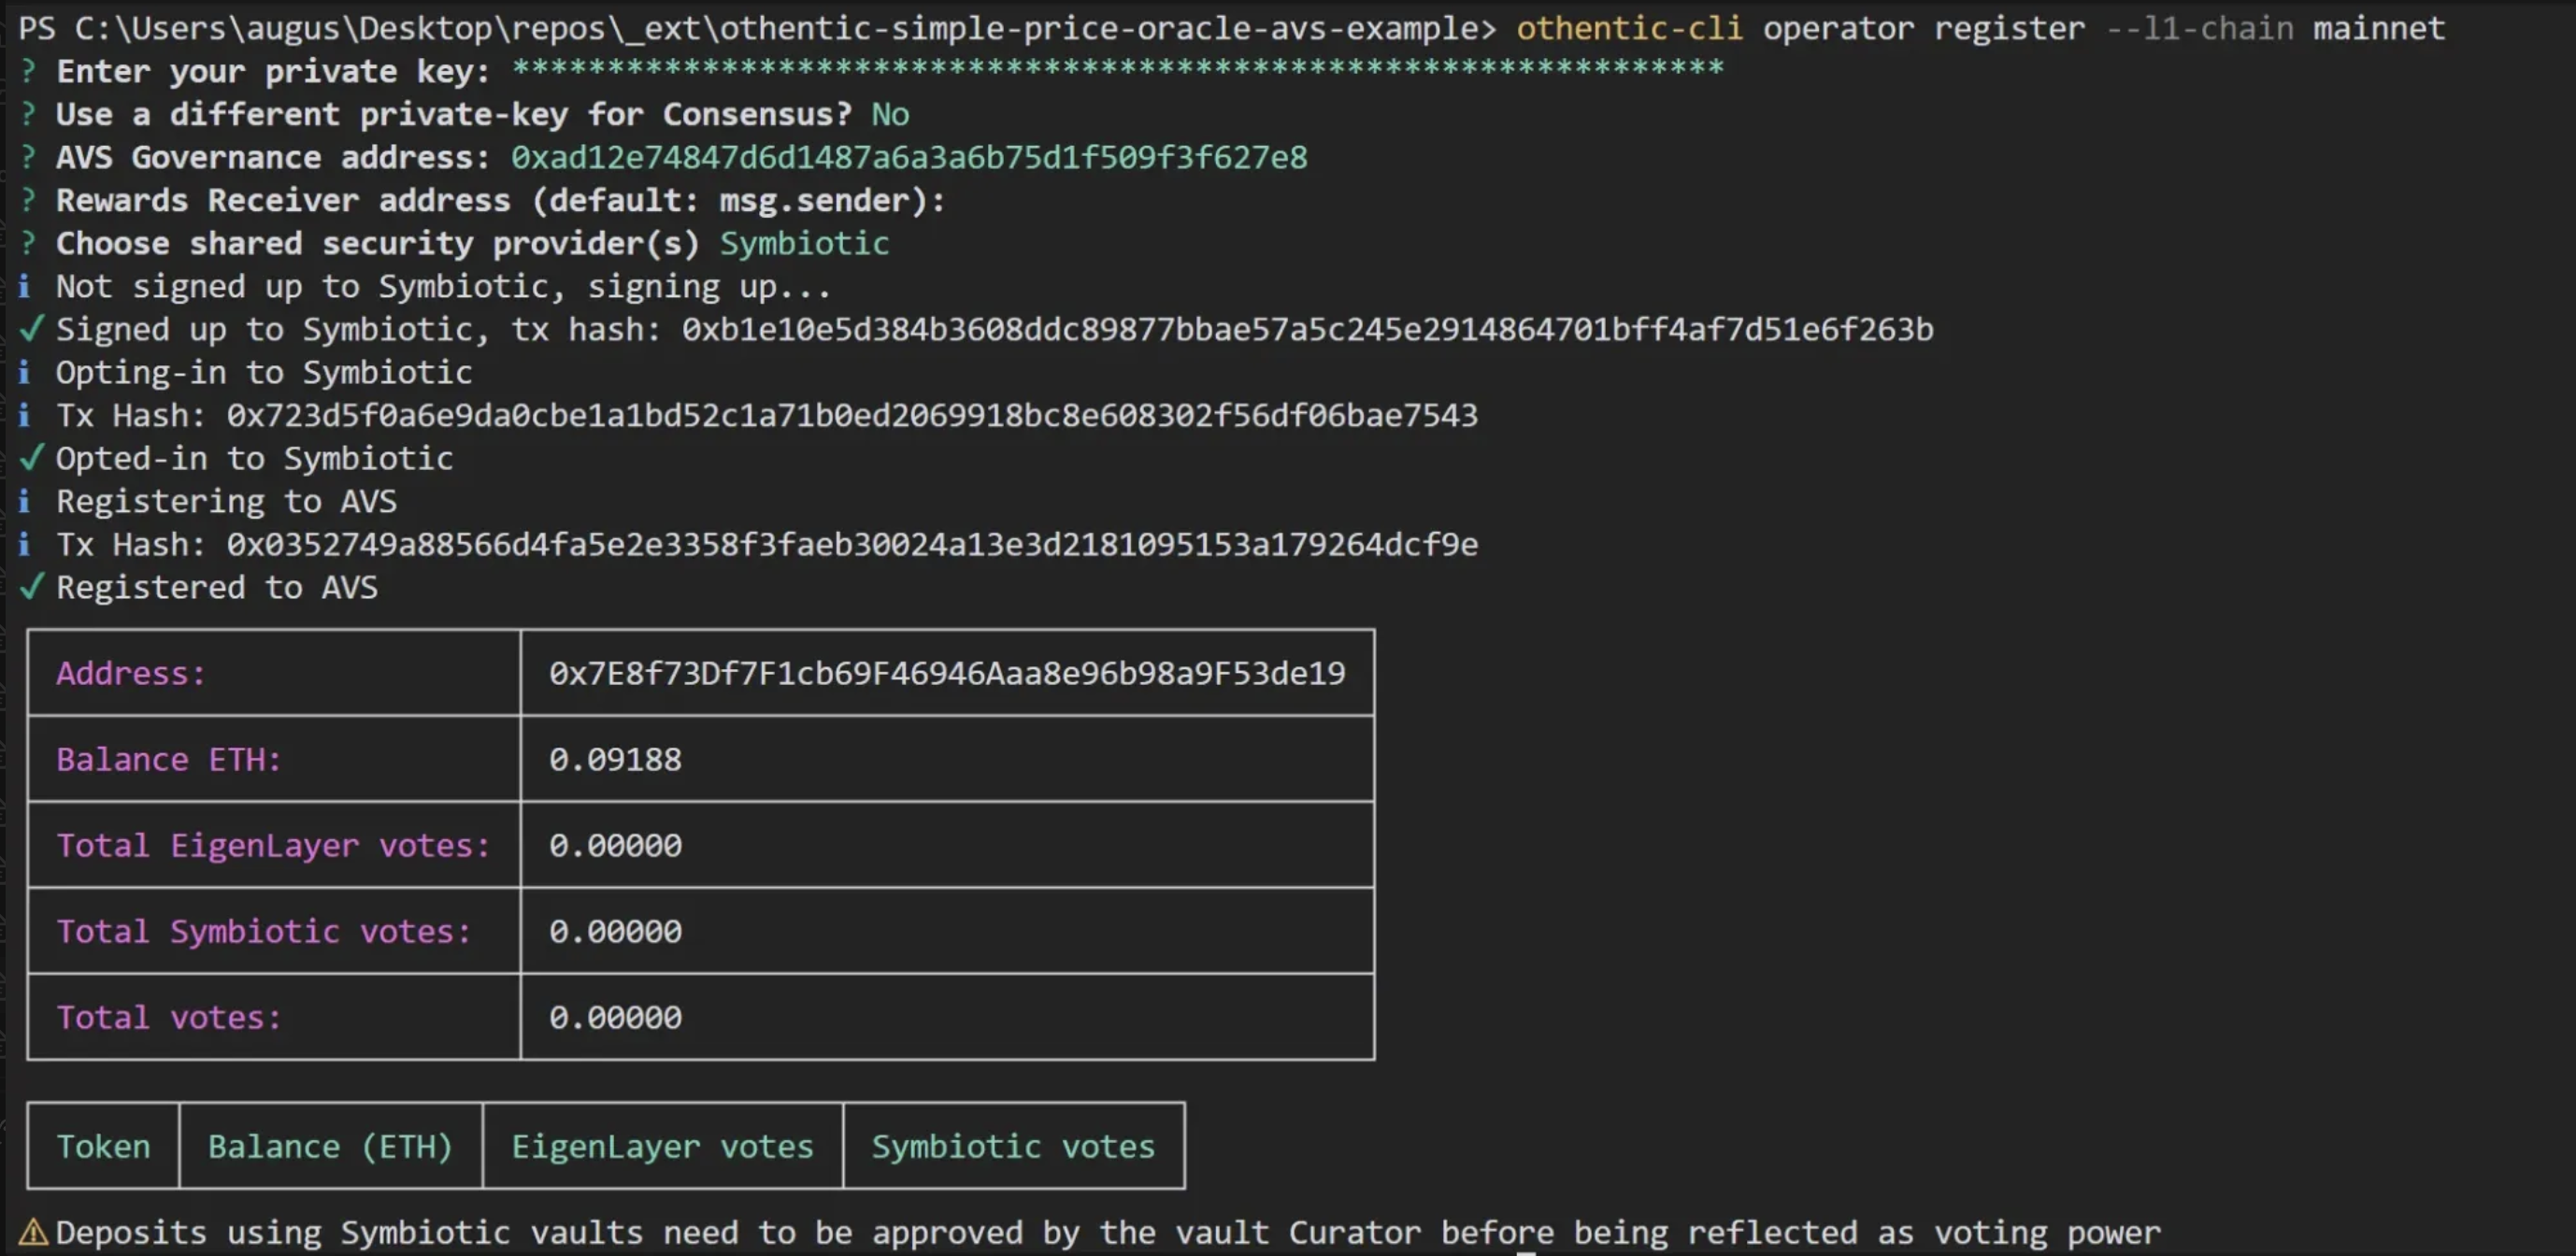
Then, run the following command:othentic-cli operator register --l1-chain mainnet
This will start up the process of registering as an Operator on both Symbiotic and your Othentic AVS.
- Controller key:
- Used to sign up with the shared security protocol.
- Represents the account to which restakers delegate their staked assets.
- Consensus key:
- Used by the operator to sign the consensus messages.
Enter your private key: <Operator Private Key / Controller Key>AVS Governance address - 0xAD12e74847d6D1487A6a3A6b75D1f509f3F627e8Rewards Receiver address (default: msg.sender): <Enter to go with default or enter an alternate account address to receive rewards>Choose shared security provider(s) - <Choose Symbiotic>Example :

If you Choose to use a different private-key for Consensus :
You are now registered and ready to operate.Please contact Capx Cloud team in-case you need any additional assistance in registrations.
Verify Registration
NETWORK_ADDRESS - address of the Capx Cloud network.
OPERATOR_ADDRESS - an address of the operator to check an opt-in status of
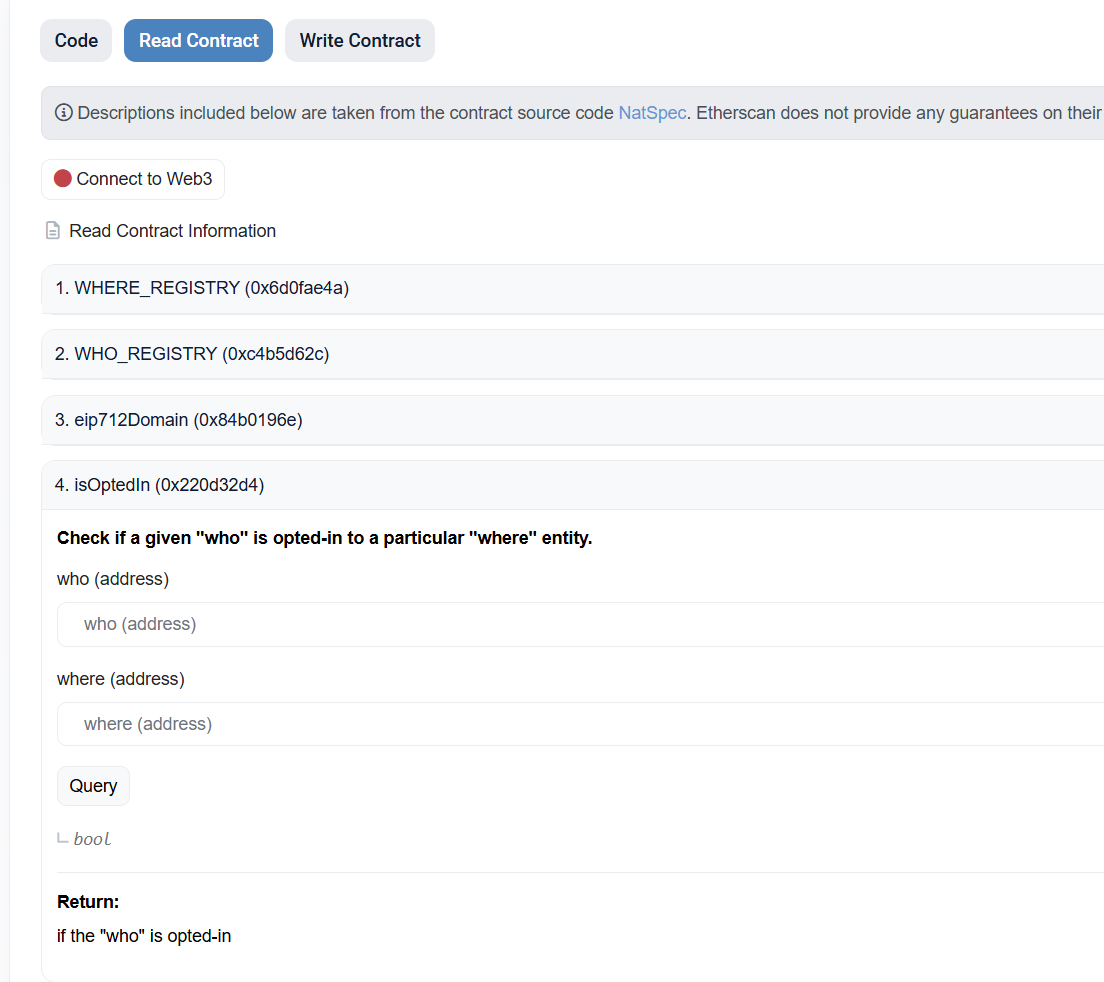
Using Etherscan to check:


- Put
OPERATOR_ADDRESS in who parameter, NETWORK_ADDRESS in where, and click “Query”
- It should return
true
1. Register to Symbiotic
Capx Cloud Network address - 0x476Ceb36F6f250297Bb59d45f00bdB053445E9CB
- Open “Transaction builder”
- Put
0x7133415b33B438843D581013f98A08704316633c as contract address
- Choose
optIn method
- Input the
Capx Cloud network’s address
- Sign & send transaction
NETWORK_ADDRESS - address of the Capx Cloud network.
See https://docs.symbiotic.fi/guides/cli/#opt-in-networkUsing CLI to check:
NETWORK_ADDRESS - address of the Capx Cloud network.
OPERATOR_ADDRESS - an address of the operator to check an opt-in status of
See https://docs.symbiotic.fi/guides/cli#check-opt-in-network2. Register as Operator - AVS
Official Othentic Guide - here Prerequisites:
- Node.js v22.6: Ensure Node.js is installed, preferably managed via Node Version Manager (NVM).
- OpenSSL: Required for cryptographic operations.
- Gnosis Safe Address: The address of your deployed Gnosis Safe on the Ethereum network.
- BLS Private Key: A private key associated with the Boneh–Lynn–Shacham (BLS) signature scheme, used for generating authentication signatures.
- AVS Governance Address: The address of the Attestation Verification System (AVS) governance contract.
- Ethereum RPC URL: An RPC endpoint URL for interacting with the Ethereum network.
Step-by-Step Guide:
-
Clone the Repository:
Begin by cloning the Othentic EIP-1271 Operator Registration Script repository and navigating into its directory
git clone https://github.com/Othentic-Labs/othentic-eip1271-operator-registration-script.git
cd othentic-eip1271-operator-registration-script
-
Install Dependencies:
Install the necessary Node.js packages:
-
Generate AVS BLS Public Key & Authentication Signature:
This script generates an authentication signature to register your Gnosis Safe as an operator in the AVS. Importantly, this process does not require exposing your private keys.
ts-node scripts/genAvsRegisterBlsSignature.ts <BLS_PRIVATE_KEY> <AVS_GOVERNANCE_ADDRESS> <GNOSIS_SAFE_ADDRESS> <RPC_URL>
Parameters :
<BLS_PRIVATE_KEY>: Your BLS private key.
<AVS_GOVERNANCE_ADDRESS>: The AVS governance contract address.
<GNOSIS_SAFE_ADDRESS>: Your Gnosis Safe address.
<RPC_URL>: The Ethereum network RPC URL.
Example :
ts-node scripts/genAvsRegisterBlsSignature.ts 0x1aa4829bdf0461d6fc1d9cfb0de78eec4b142fc722112fd0369c407d03ad3adb 0x8B8136fB6A8ea7AbA61d88da5753D8fEa2d7d5b2 0xYourGnosisSafeAddress https://mainnet.infura.io/v3/your-infura-project-id
This command will produce a JSON file containing your operator information, BLS public key, and the authentication signature. The file is saved as .othentic/othentic-avs-register-as-operator.json.
-
Register as an Operator :
To register your EIP-1271 wallet as an operator within the Othentic framework, follow these detailed steps:
EIP-1271 Wallet -
Gnosis Safe
1. Access the Safe Interface:
2. Initiate a Contract Interaction:
- Click on “New Transaction” and choose “Contract Interaction.”
3. Input Contract Details
- Contract Address: Enter the address (
0xAD12e74847d6D1487A6a3A6b75D1f509f3F627e8) of the contract containing the registerAsOperator function.
- ABI: If the contract’s ABI isn’t already available, add it to enable function selection.
4. Select the Function:
- From the list of functions, select
registerAsOperator.
5. Prepare Function Parameters:
-
The
registerAsOperator function accepts a single parameter of type OperatorRegistrationParams, defined as:
struct OperatorRegistrationParams {
uint256[4] blsKey;
address rewardsReceiver;
BLSAuthLibrary.Signature blsRegistrationSignature;
bytes authToken;
}
-
Parameter Breakdown:
blsKey: Extract the four uint256 values from your JSON file and arrange them in an array.
rewardsReceiver: Specify the address that will receive rewards. This can be your Gnosis Safe address or another designated address.
blsRegistrationSignature: Extract the two uint256 values from your JSON file and structure them accordingly.
authToken: A bytes value; (Not required) this can be an empty byte sequence (0x).
-
Input Format:
- For the
blsKey, input the array as comma-separated values within square brackets, e.g., [value1, value2, value3, value4].
- For the
blsRegistrationSignature, input the signature array similarly, e.g., [sigPart1, sigPart2].
- Ensure all addresses are in checksum format and all numeric values are in decimal form.
6. Execute the Transaction:
- After entering all parameters correctly, proceed to submit the transaction.
- The Safe will require the necessary number of confirmations from the designated signers to execute the transaction.